Even though it is a high-end product, MacBook can still have Wi-Fi errors, affecting the experience. Here is how to fix it when MacBook cannot access the Internet!
 |
Fix MacBook not connecting to Wi-Fi quickly
When MacBook connects to Wi-Fi but cannot access the Internet, access is interrupted. However, this error can be easily fixed by the following methods.
How to restart your MacBook
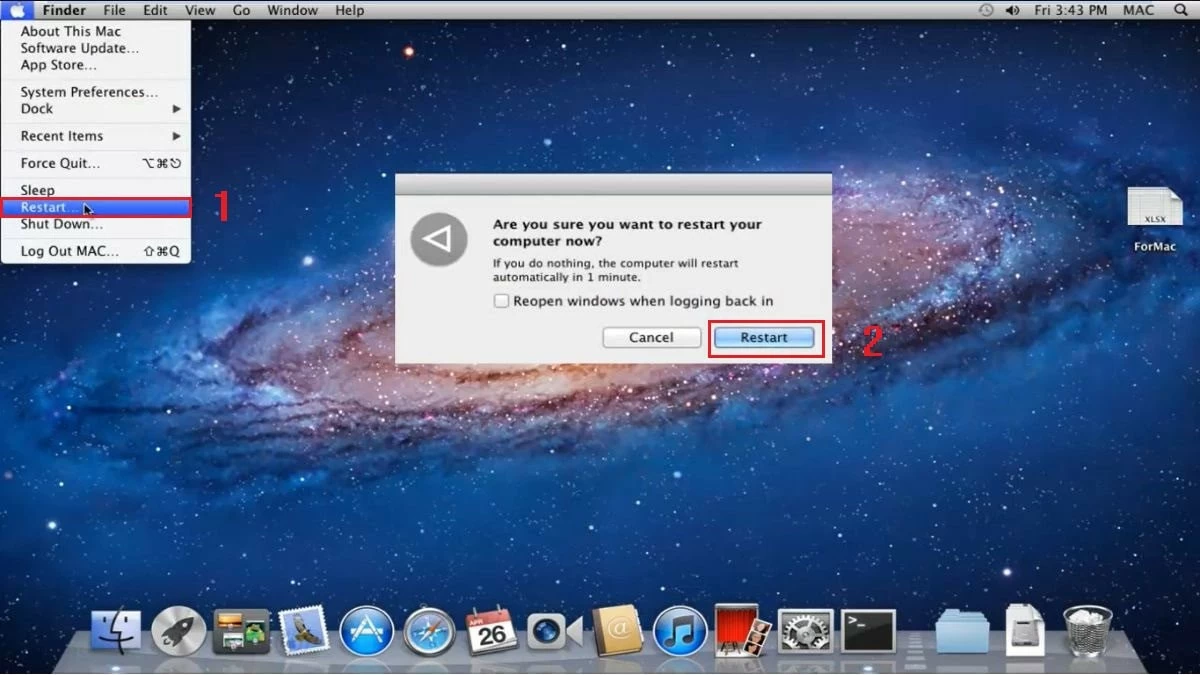
To fix the MacBook not connecting to Wi-Fi error, you can try restarting the computer. This is a simple and often effective way to fix the problem. Click on the Apple icon in the left corner of the screen, select "Restart" and wait for the computer to restart. Then, try connecting to Wi-Fi again to check if the error is fixed.
 |
How to check Wi-Fi network
If your MacBook connects to Wi-Fi but can't get online, the problem may be with the Wi-Fi network. Try connecting to Wi-Fi with another device to test. If Wi-Fi still doesn't work, you can try the following:
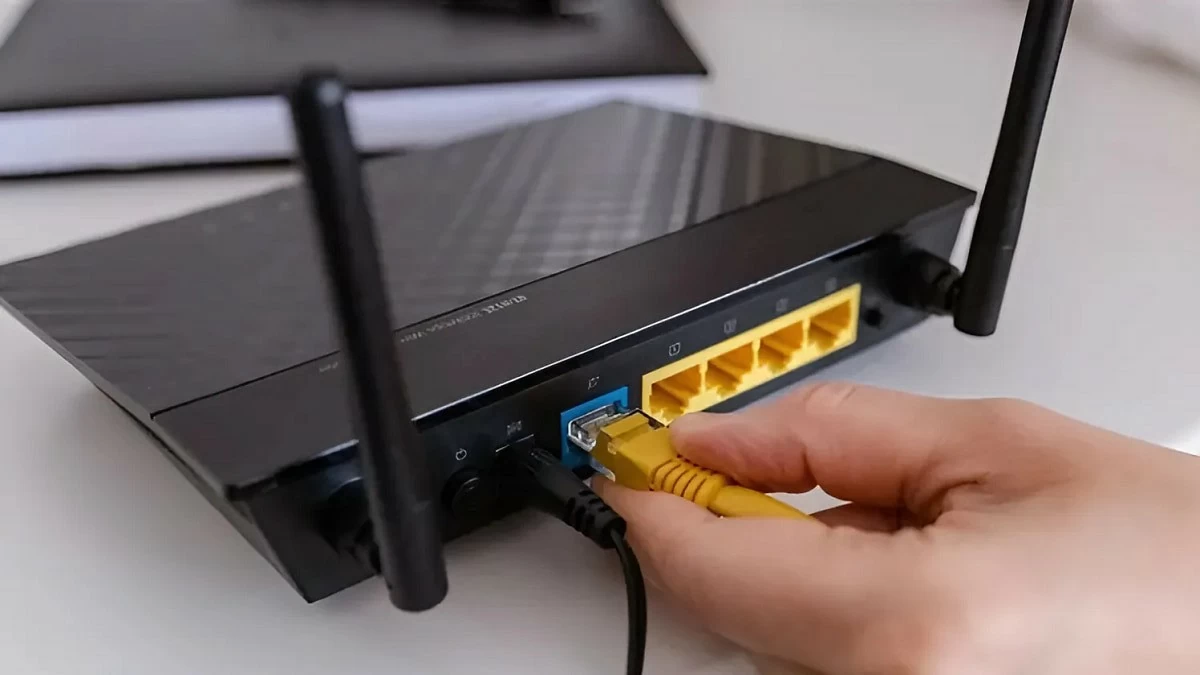
- Restart the Wi-Fi router and after a few minutes, reboot your computer.
- If still not working, replace the connection cable as the current cable may be faulty.
- If the problem is still not resolved, contact your Internet service provider (ISP) to check the status of your local network.
 |
How to test Ethernet cable
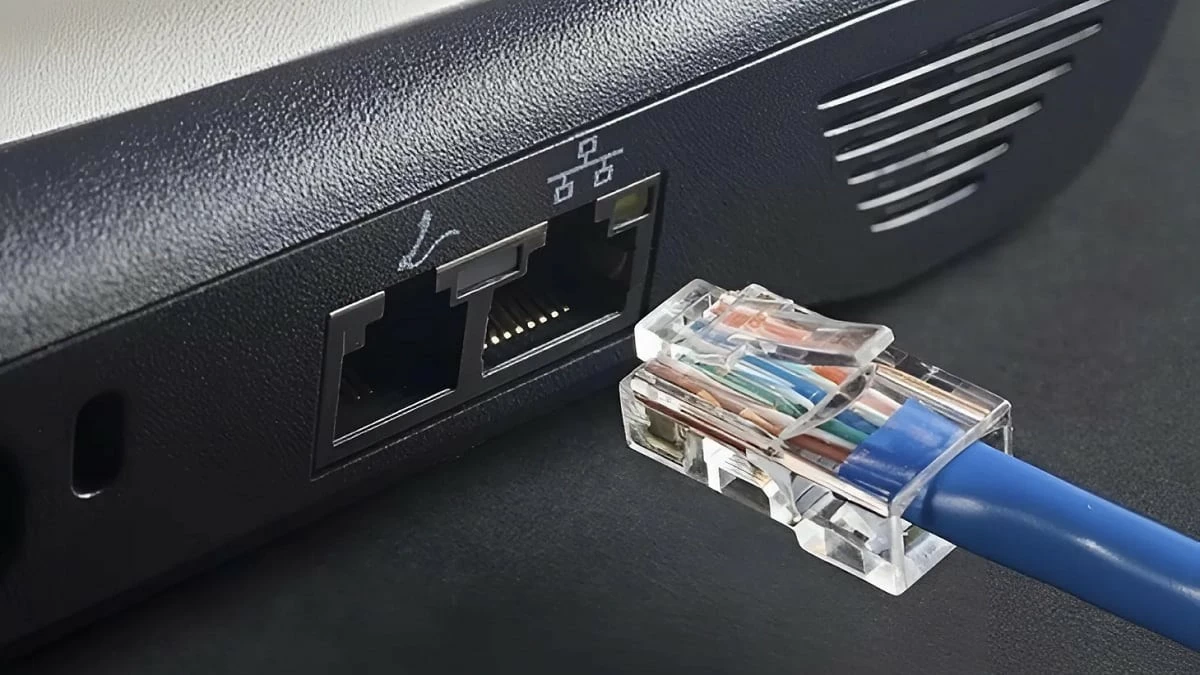
If your MacBook won't connect to Wi-Fi, it may be due to a problem with the Ethernet cable between your modem and router. To fix this, double-check your Ethernet cable. First, unplug it from the port and plug it back in firmly. Make sure the cable isn't bent, frayed, or otherwise damaged.
 |
How to check distance between device and router
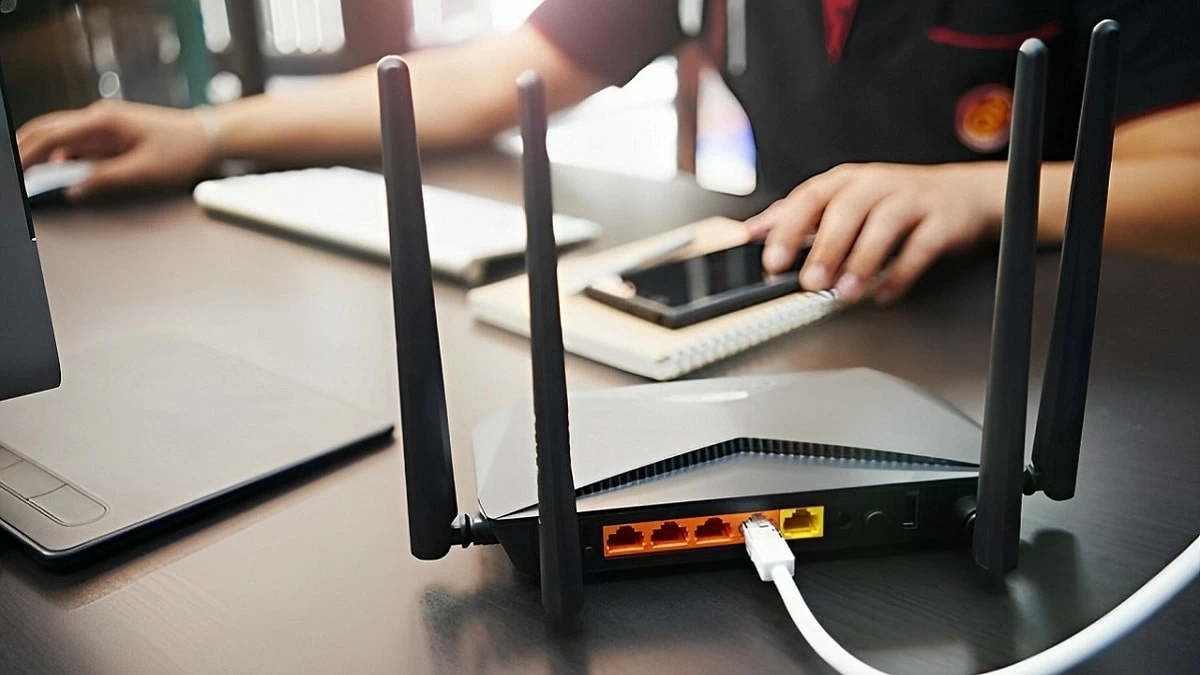
When connecting your MacBook to Wi-Fi, place it close to the router to ensure a stable and strong signal. At the same time, avoid placing the router near devices such as phones, cameras, power cables, microwaves... or any device that can cause interference.
 |
How to check WiFi on computer
If the Wi-Fi network and router are still stable, you can fix the MacBook not accessing the Internet error by restarting the Wi-Fi as follows:
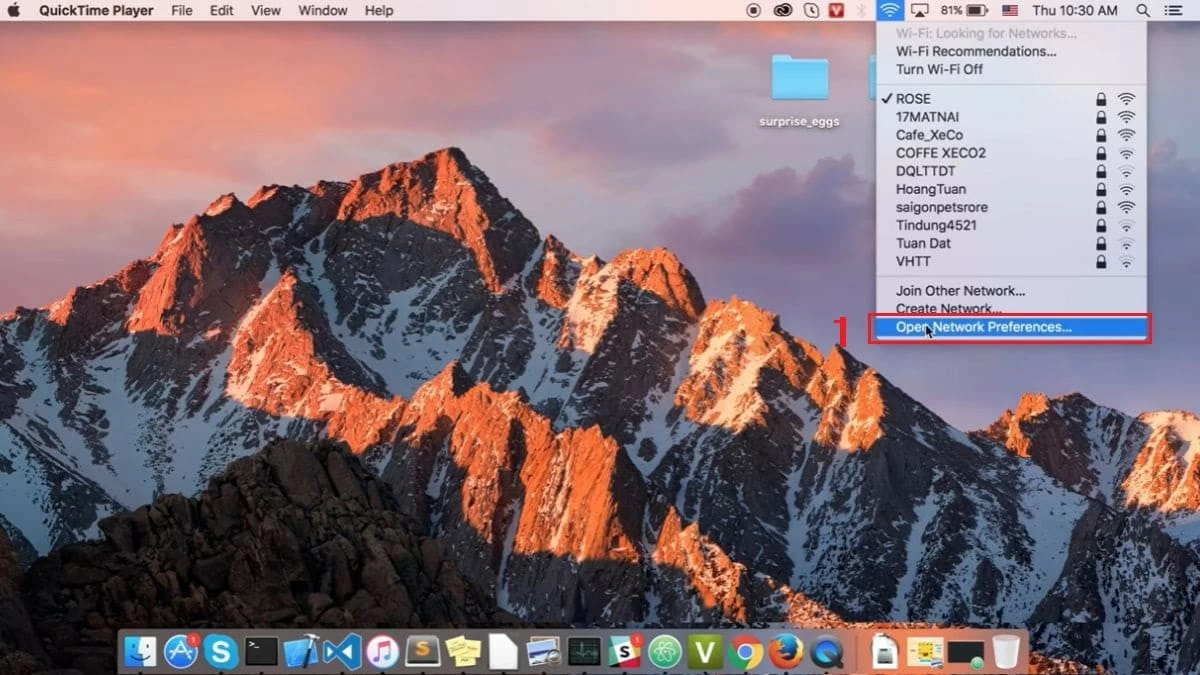
Step 1: Click on the Wi-Fi icon in the right corner of the MacBook screen.
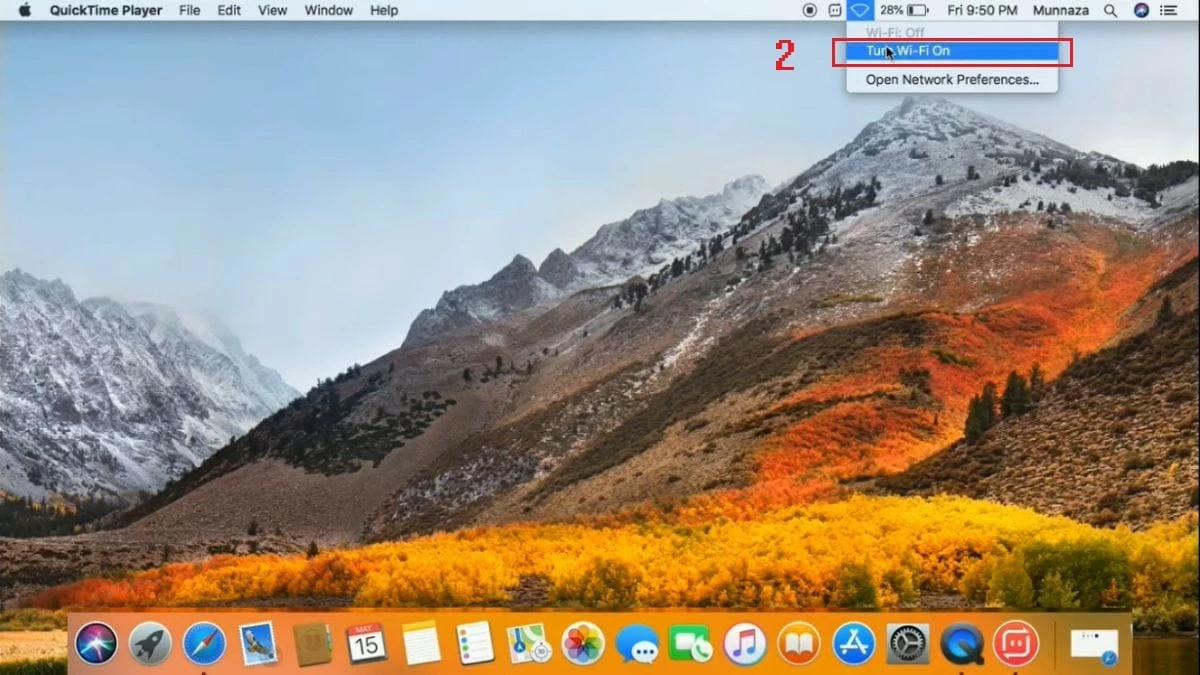
Step 2: Next, turn off Wi-Fi, wait about 30 seconds, then turn it back on.
 |
Step 3: Then, turn Wi-Fi back on and try connecting to the network again.
 |
How to update MacBook operating system
If your MacBook already has a new version of macOS, try upgrading the operating system to fix the Wi-Fi problem. Follow these steps:
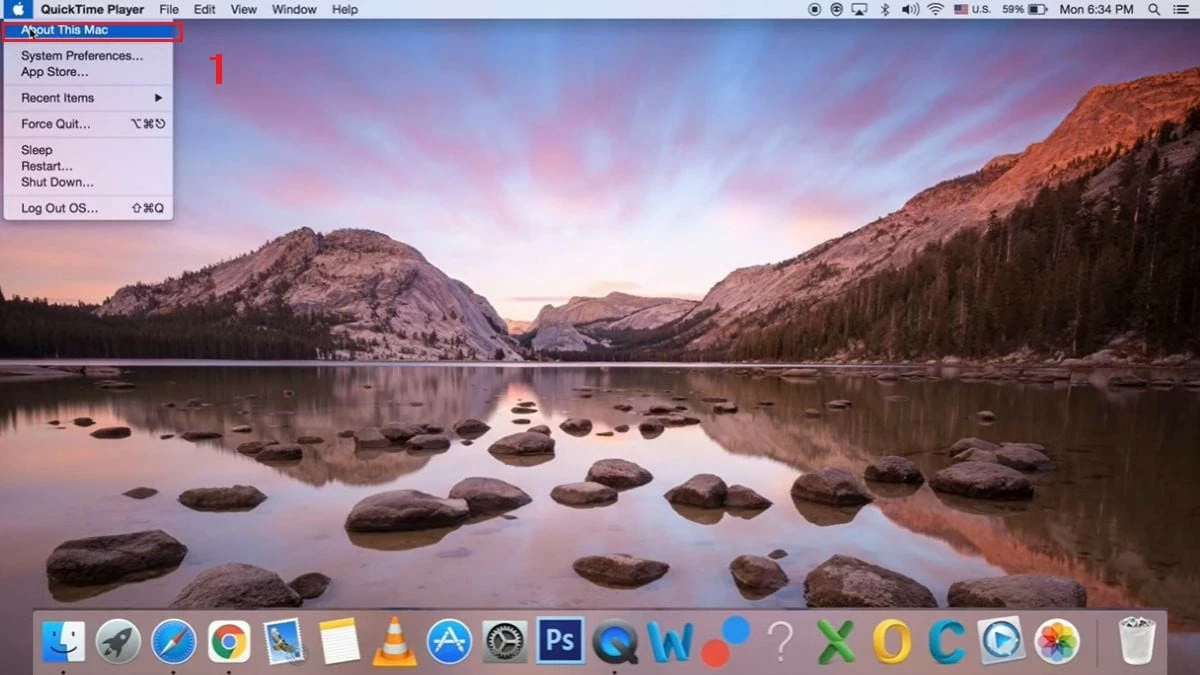
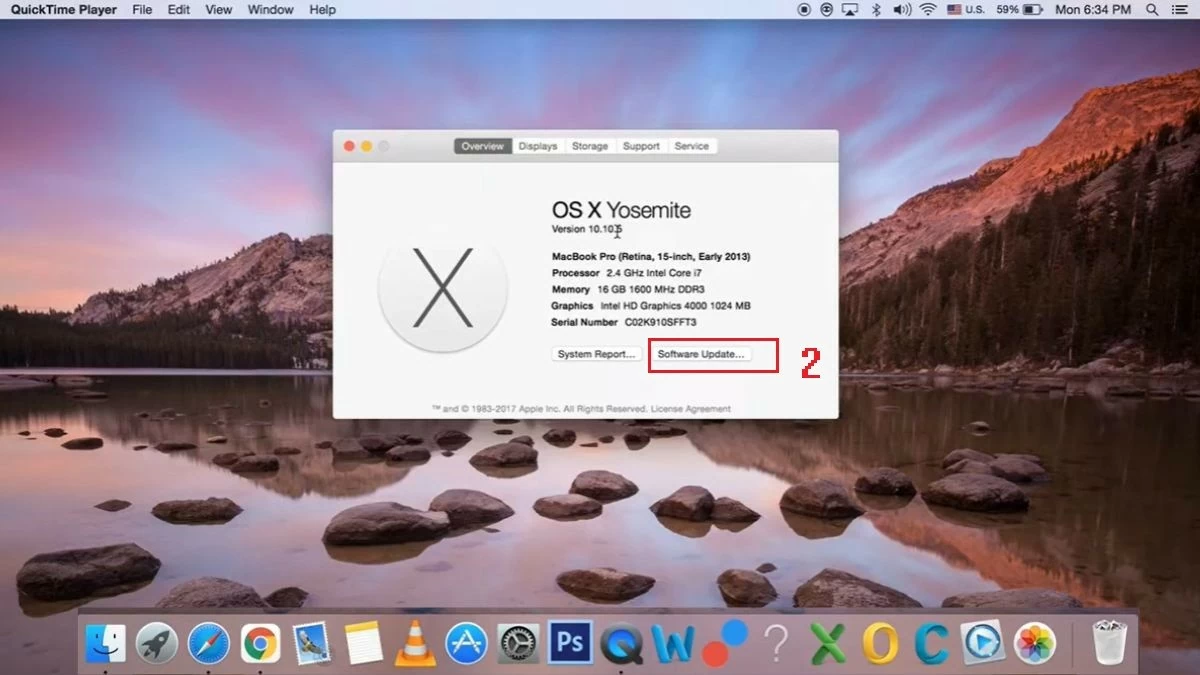
Step 1: Click the Apple icon in the upper left corner of your MacBook screen, then select "About This Mac."
 |
Step 2: Next, click on "Software Update…" to check if there is a new version available.
 |
Step 3: When an update is available, tap "Restart Now" to begin the upgrade process.
How to reconnect to Wi-Fi network
If you have tried the above methods and your MacBook still cannot connect to Wi-Fi, you can try deleting the logged-in Wi-Fi network and adding it again. Specifically:
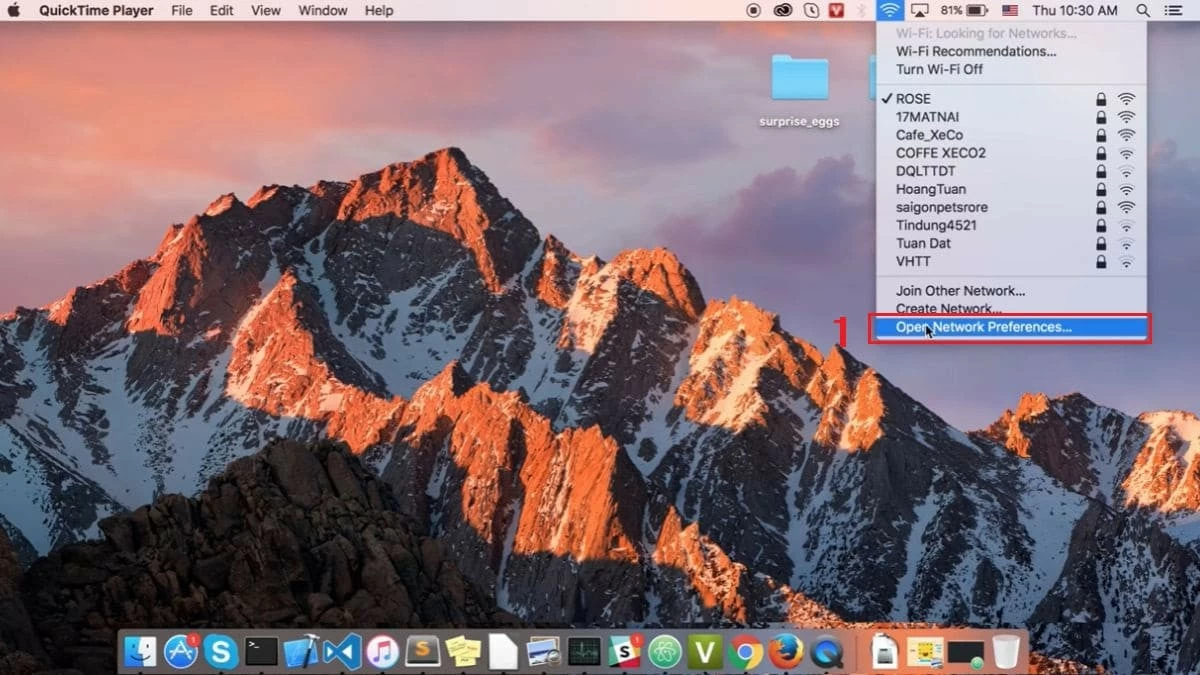
Step 1: Click on the Wi-Fi icon in the right corner of the MacBook screen, then select "Open Network Preferences…".
 |
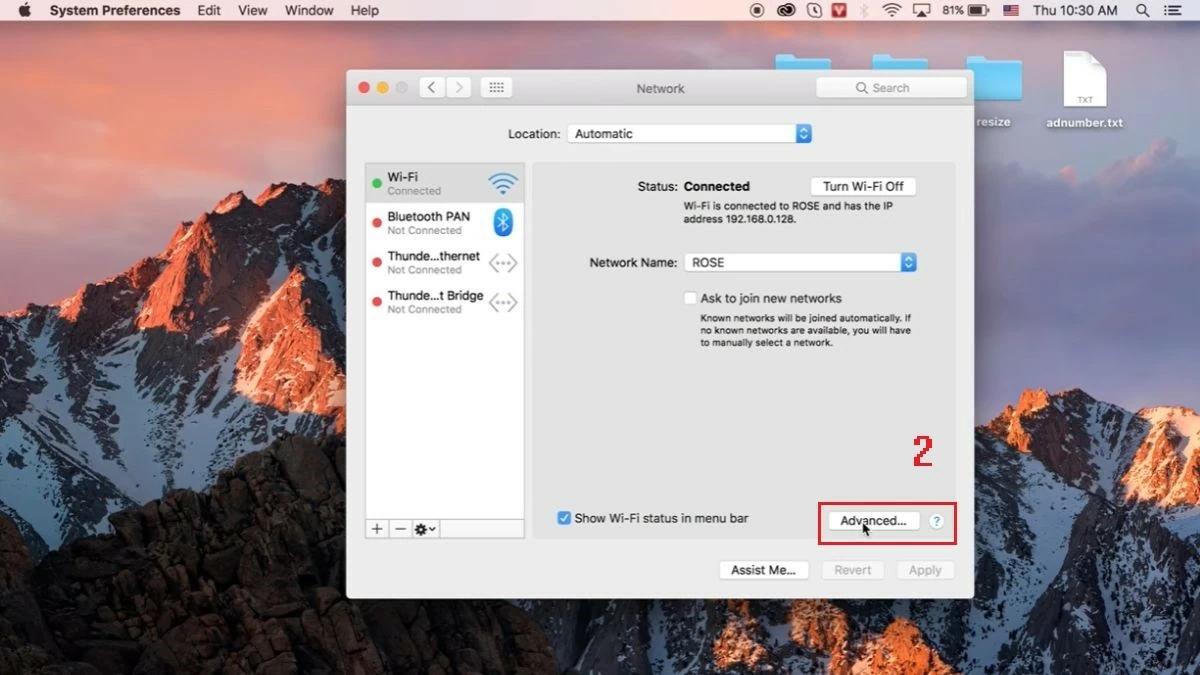
Step 2: Here, click on "Advanced."
 |
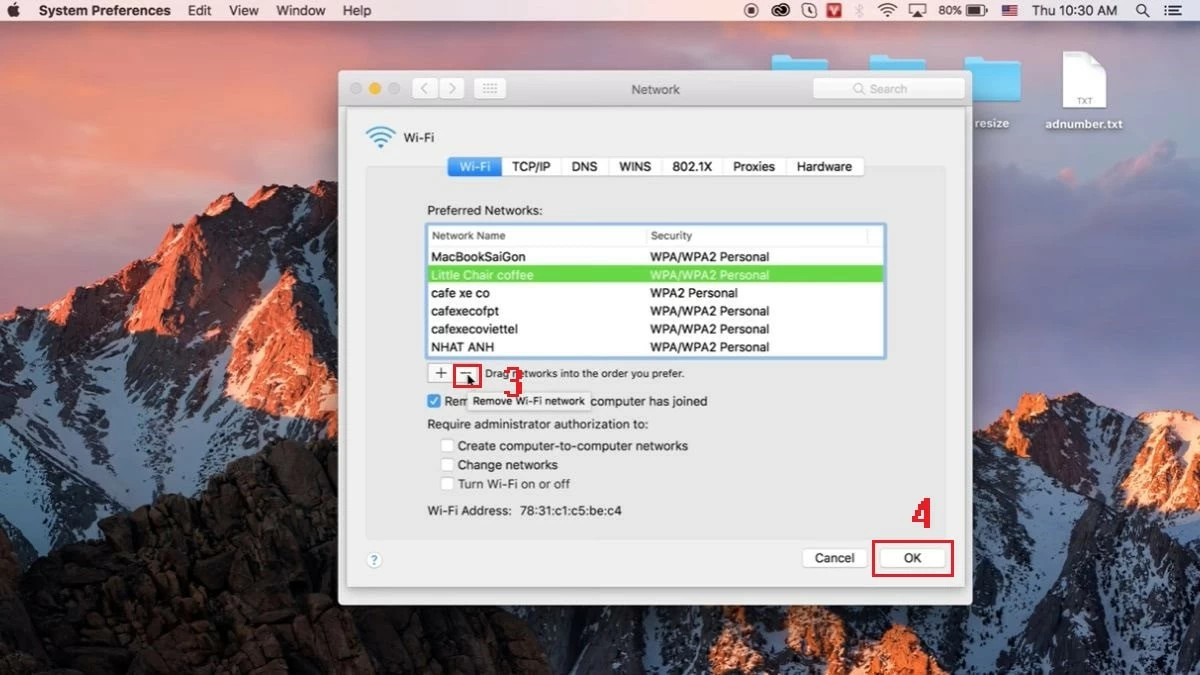
Step 3: Next, select the Wi-Fi network you are using and delete it by clicking on the minus sign (-) below, then press "OK."
 |
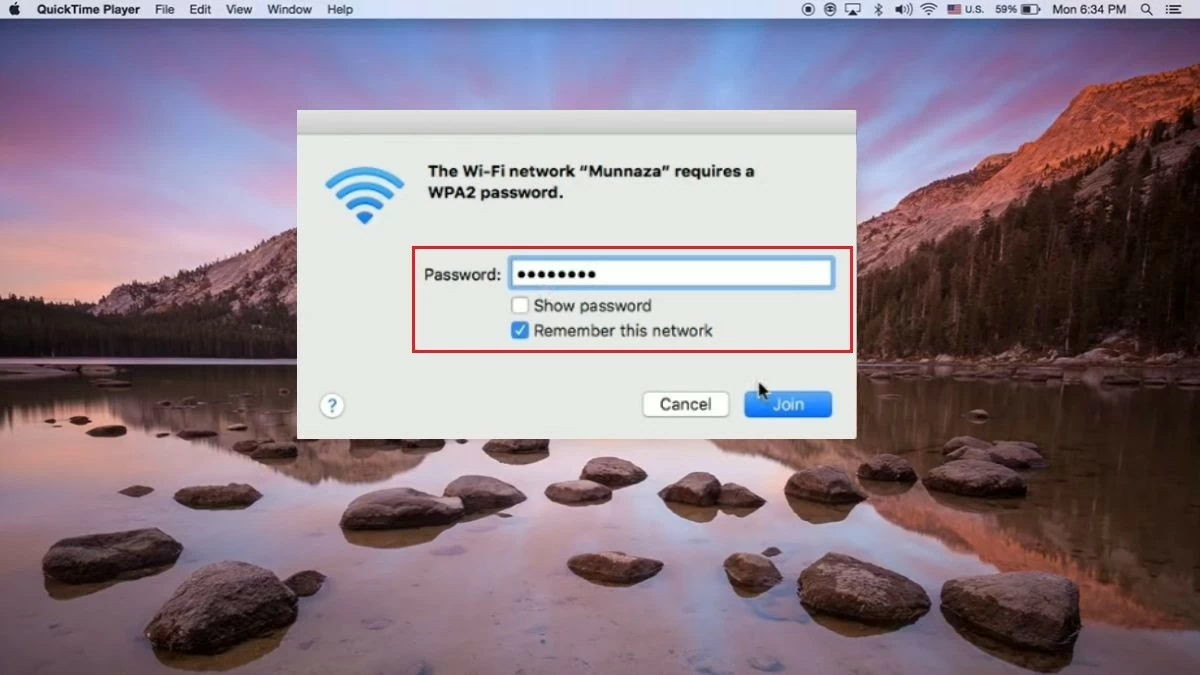
Step 4: Finally, enter the Wi-Fi password to reconnect to the network.
 |
How to check TCP/IP settings
If you can't connect to Wi-Fi on your MacBook, you should check your TCP/IP settings to fix the problem. Follow these steps:
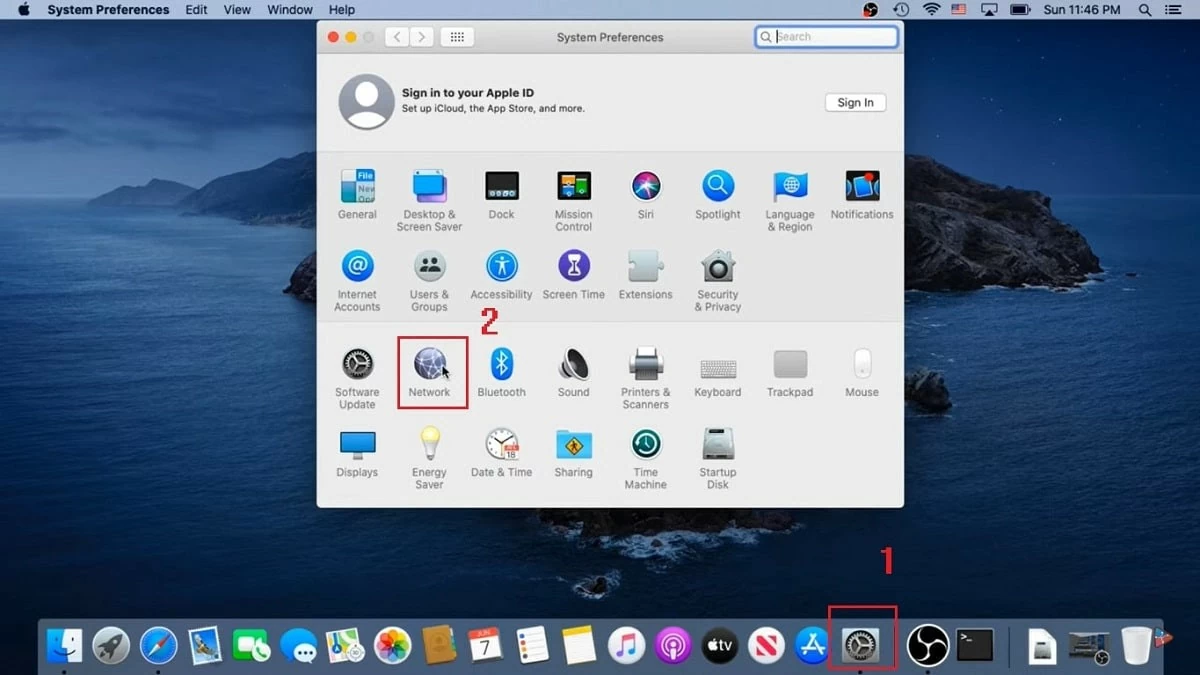
Step 1: Open "System Preferences" on your MacBook screen and select "Network."
 |
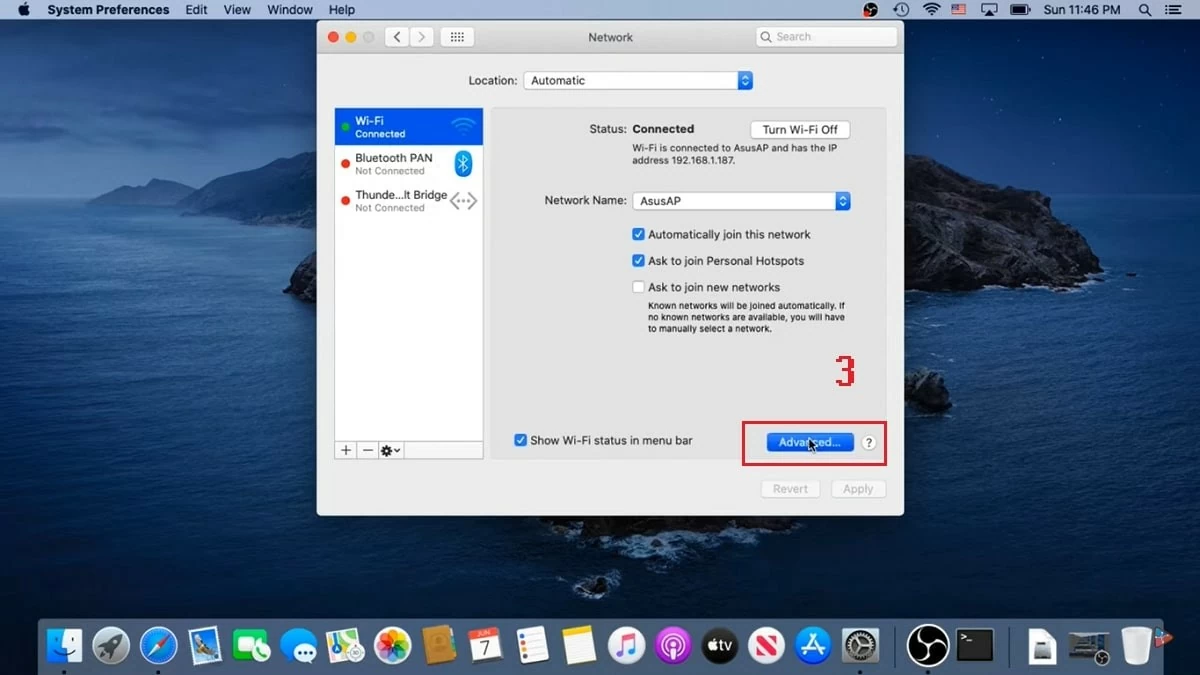
Step 2: Next, select "Advanced."
 |
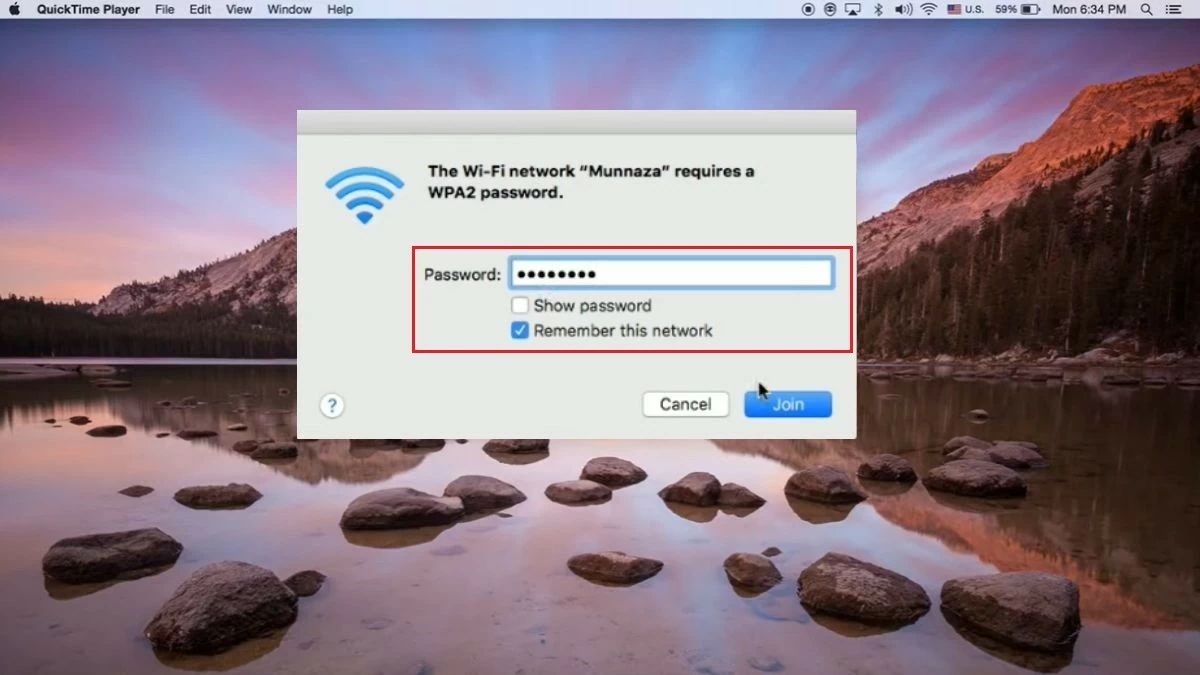
Step 3: When the new tab appears, select the "TCP/IP" tab. Here, find the "IPv4 Address" item, then click "Renew DHCP Lease" and finally click "OK" to complete.
 |
How to change DNS
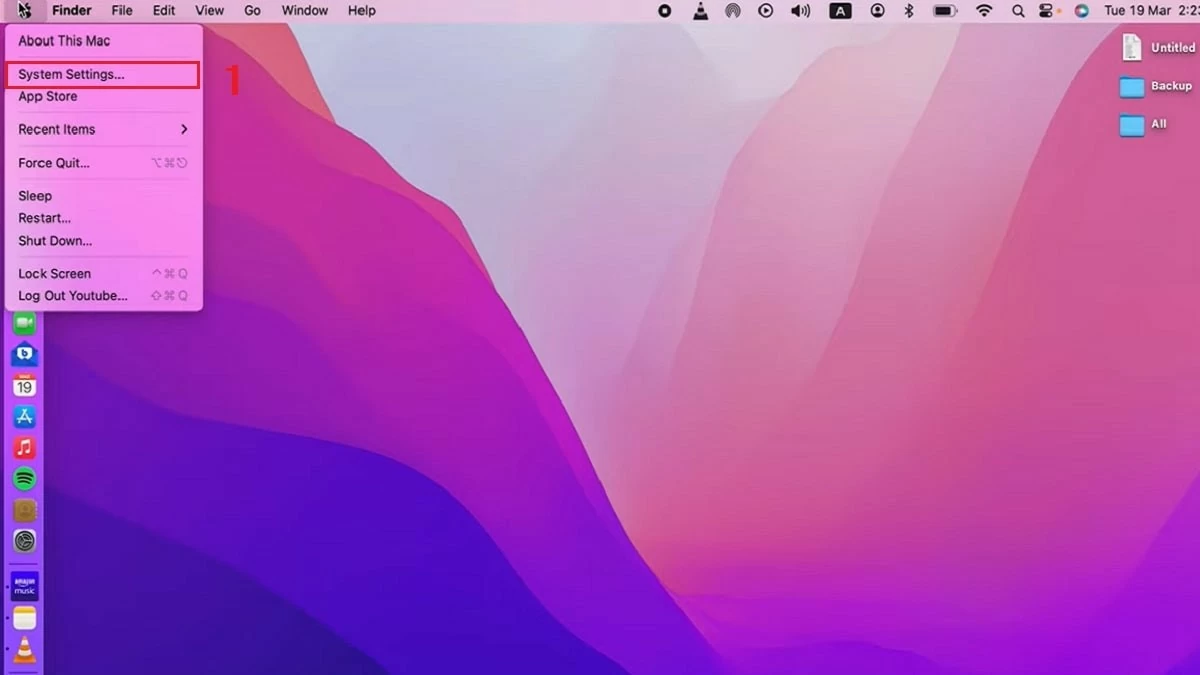
The DNS system helps convert website domain names into IP addresses. Therefore, changing the DNS server can help fix the MacBook not connecting to Wi-Fi error, improve Internet speed and increase network stability. Here is a simple way to change DNS:
Step 1: First, click on the Apple icon in the left corner of the screen, then select "System Settings."
 |
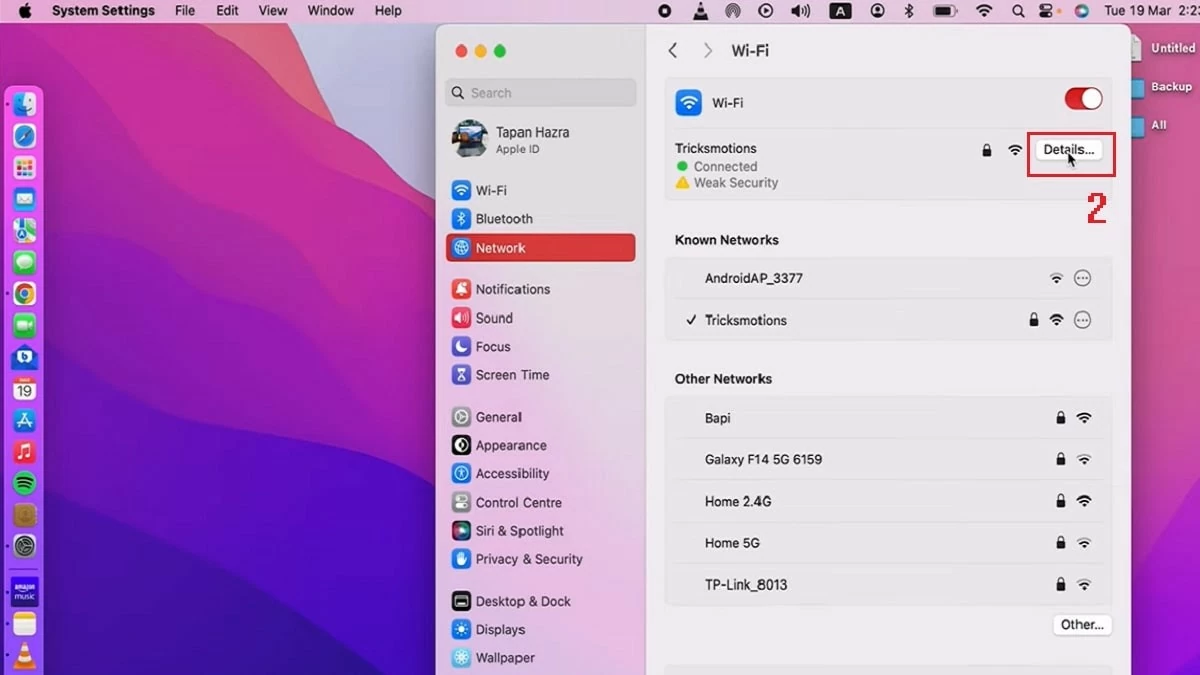
Step 2: Under "Network," click "Details."
 |
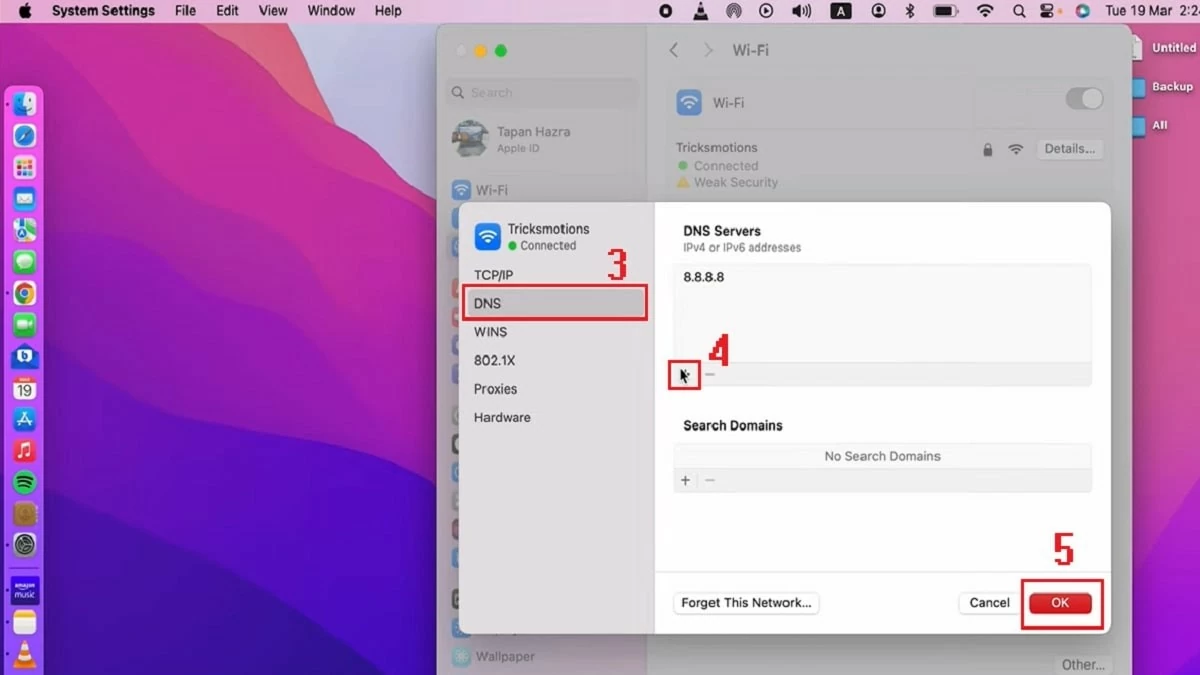
Step 3: Next, select the "DNS" tab, then click the (+) sign to add a new DNS server. Enter the IP address of the DNS server you want to use and click "OK" to save the settings.
 |
How to reset NVRAM/PRAM and SMC
If changing DNS doesn't solve your MacBook Wi-Fi connection problem, you can reset NVRAM/PRAM and SMC with the following steps:
Reset PRAM/NVRAM:
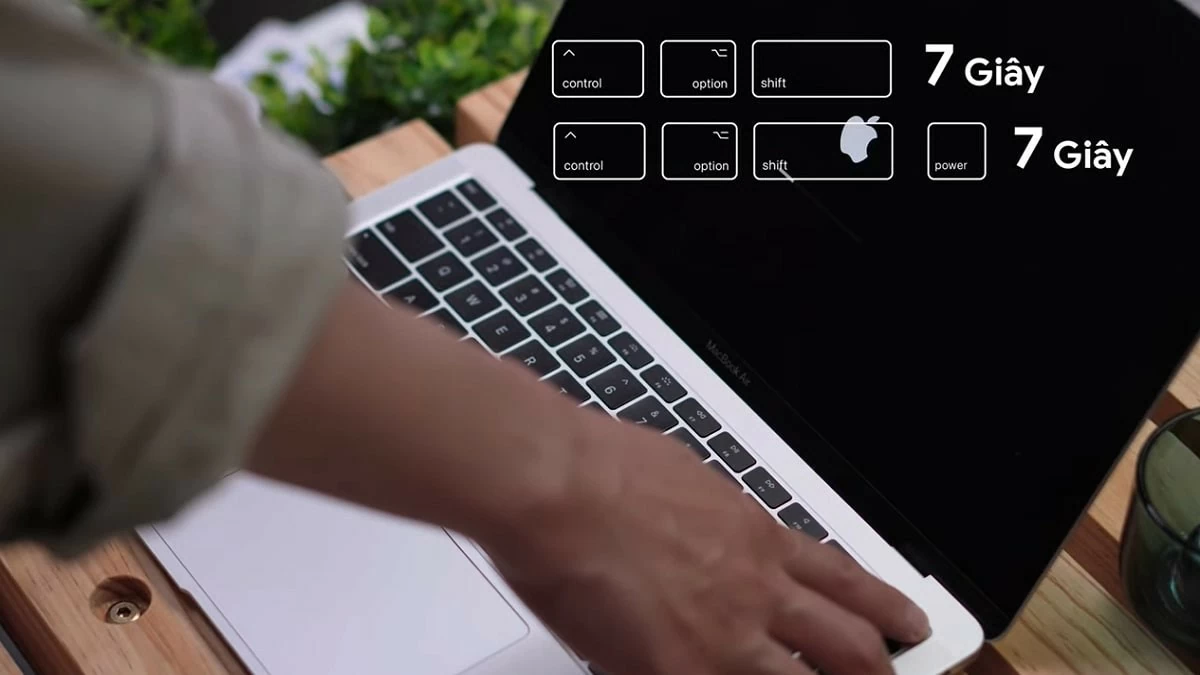
Step 1: Restart your MacBook. When you hear the chime, hold down the Shift + Control + Option keys and hold the power button for about 10 seconds.
Step 2: When the computer starts to restart, hold down the Command + Option + P + R key combination.
Step 3: Wait until you hear the second startup chime, the process is complete.
 |
Reset SMC:
The process for resetting the SMC (System Management Controller) depends on the type of battery your MacBook has:
- If your MacBook has a removable battery: Remove the battery, press and hold the power button for about 7 seconds, then reinsert the battery and turn on your computer.
- If your MacBook doesn't have a removable battery: Hold down the Shift + Control + Option keys on your keyboard, then hold the power button for another 7 seconds. Finally, restart your computer.
Above are the causes and solutions for the error of MacBook not connecting to Wi-Fi. Hopefully this article will help you have more good tips to handle the situation of MacBook connecting to Wi-Fi but not accessing the Internet. Apply it to make your experience of using computers, laptops, and MacBooks more convenient and better!
Source: https://baoquocte.vn/khac-phuc-loi-macbook-khong-ket-noi-duoc-wi-fi-nhanh-chong-288110.html


![[Photo] Nhan Dan Newspaper announces the project "Love Vietnam so much"](https://vstatic.vietnam.vn/vietnam/resource/IMAGE/2025/4/17/362f882012d3432783fc92fab1b3e980)
![[Photo] Promoting friendship, solidarity and cooperation between the armies and people of the two countries](https://vstatic.vietnam.vn/vietnam/resource/IMAGE/2025/4/17/0c4d087864f14092aed77252590b6bae)
![[Photo] National Assembly Chairman Tran Thanh Man meets with outstanding workers in the oil and gas industry](https://vstatic.vietnam.vn/vietnam/resource/IMAGE/2025/4/17/1d0de4026b75434ab34279624db7ee4a)

![[Photo] General Secretary To Lam receives French Ambassador to Vietnam Olivier Brochet](https://vstatic.vietnam.vn/vietnam/resource/IMAGE/2025/4/17/49224f0f12e84b66a73b17eb251f7278)
![[Photo] Closing of the 4th Summit of the Partnership for Green Growth and the Global Goals](https://vstatic.vietnam.vn/vietnam/resource/IMAGE/2025/4/17/c0a0df9852c84e58be0a8b939189c85a)






![[Photo] Welcoming ceremony for Chinese Defense Minister and delegation for friendship exchange](https://vstatic.vietnam.vn/vietnam/resource/IMAGE/2025/4/17/fadd533046594e5cacbb28de4c4d5655)





![[Video] Viettel officially puts into operation the largest submarine optical cable line in Vietnam](https://vstatic.vietnam.vn/vietnam/resource/IMAGE/2025/4/17/f19008c6010c4a538cc422cb791ca0a1)








Comment (0)