Facebook notifications in Gmail bothering you? Learn how to turn them off on iPhone, Android, and desktop to keep your inbox clean and your device performance up!
 |
Instructions to turn off Facebook notifications on gmail using phone
You can easily turn off Facebook notifications in Gmail on your phone. This will not only help you avoid annoying notifications but also make your inbox cleaner and easier to manage. The process on Android and iPhone is simple and quick, just a few steps. Here are detailed instructions for both operating systems:
On iPhone
For iPhone users, turning off Facebook notifications on Gmail is also very easy to do.
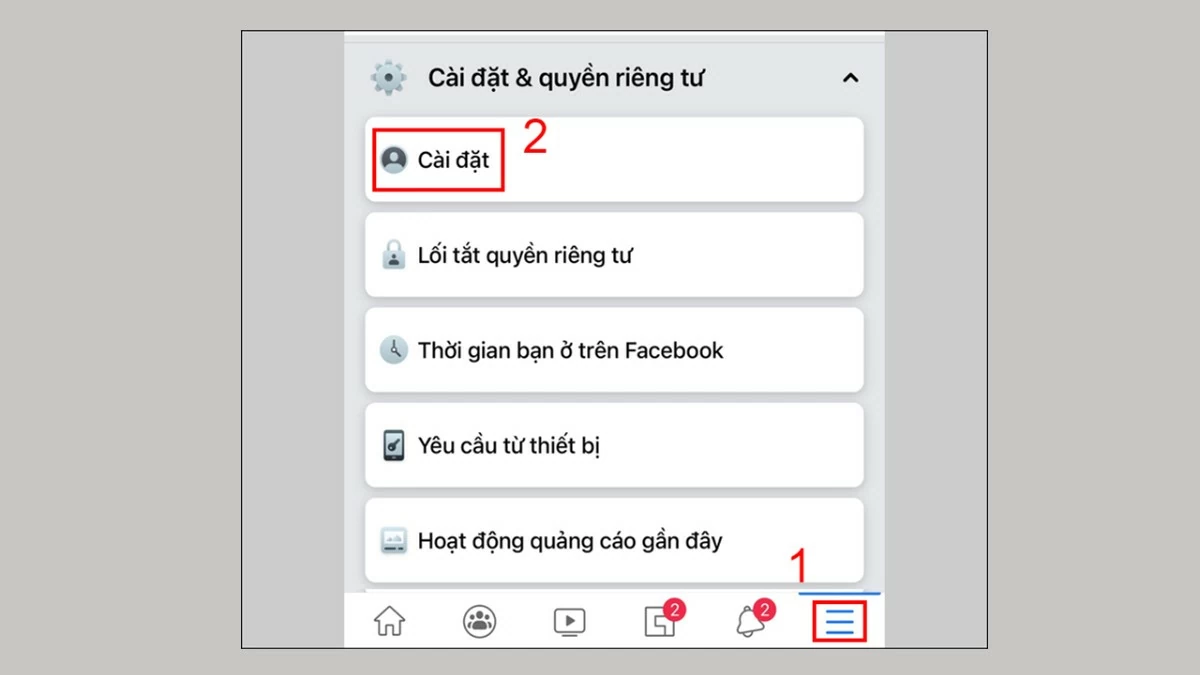
Step 1: Open the Facebook app, tap the Menu icon (three horizontal lines) in the lower right corner, then scroll down to Settings & Privacy and select Settings.
 |
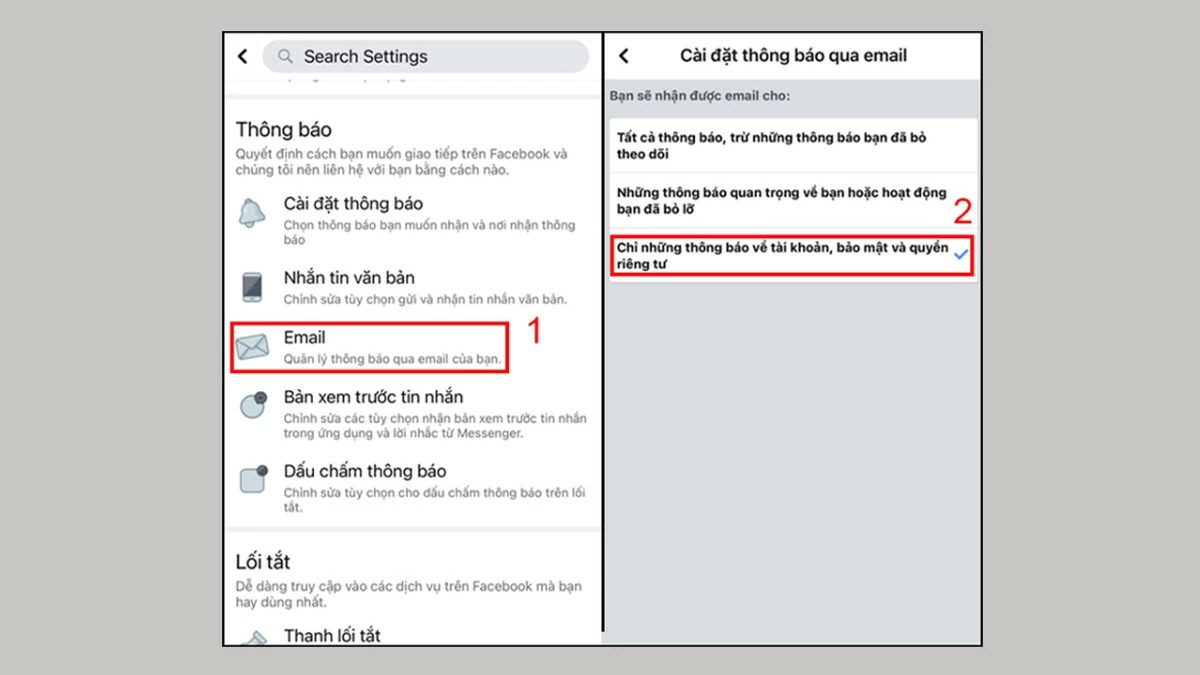
Step 2: Scroll down to Notifications and tap Email. Next, choose to disable Facebook notifications on Gmail by only keeping notifications related to your account, security, and privacy.
 |
On Android Phone
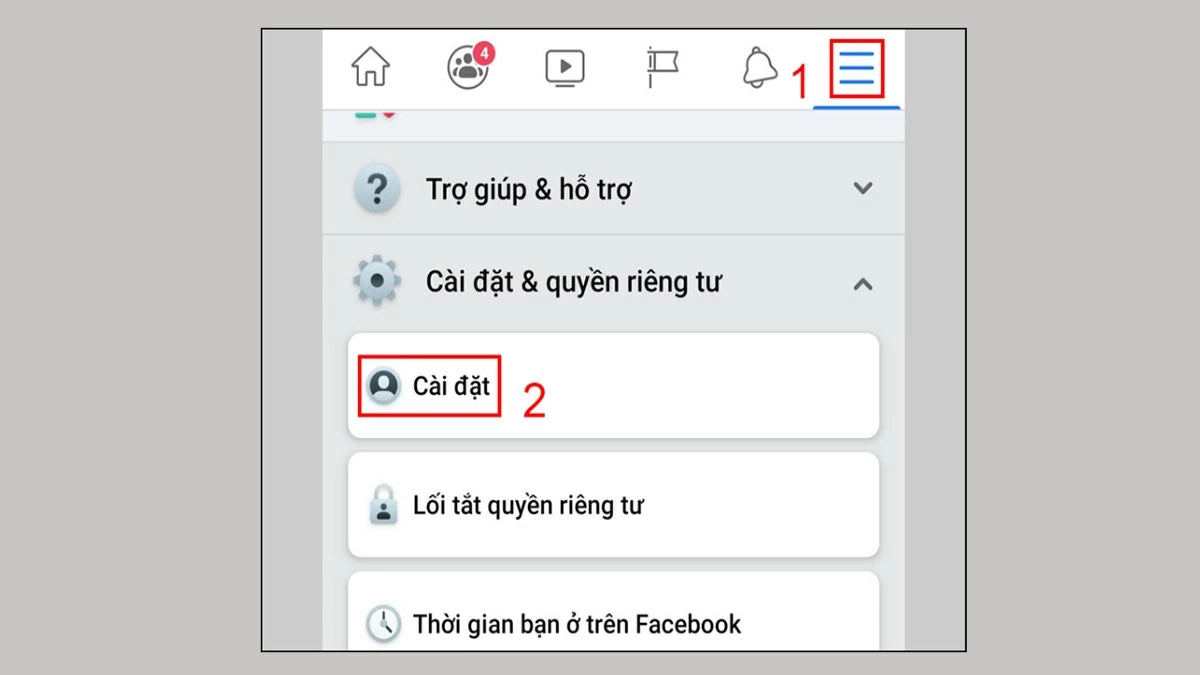
Step 1: Open the Facebook app on your phone, then tap the menu icon (three horizontal lines) in the upper right corner. Scroll down and select "Settings & Privacy," then select "Settings."
 |
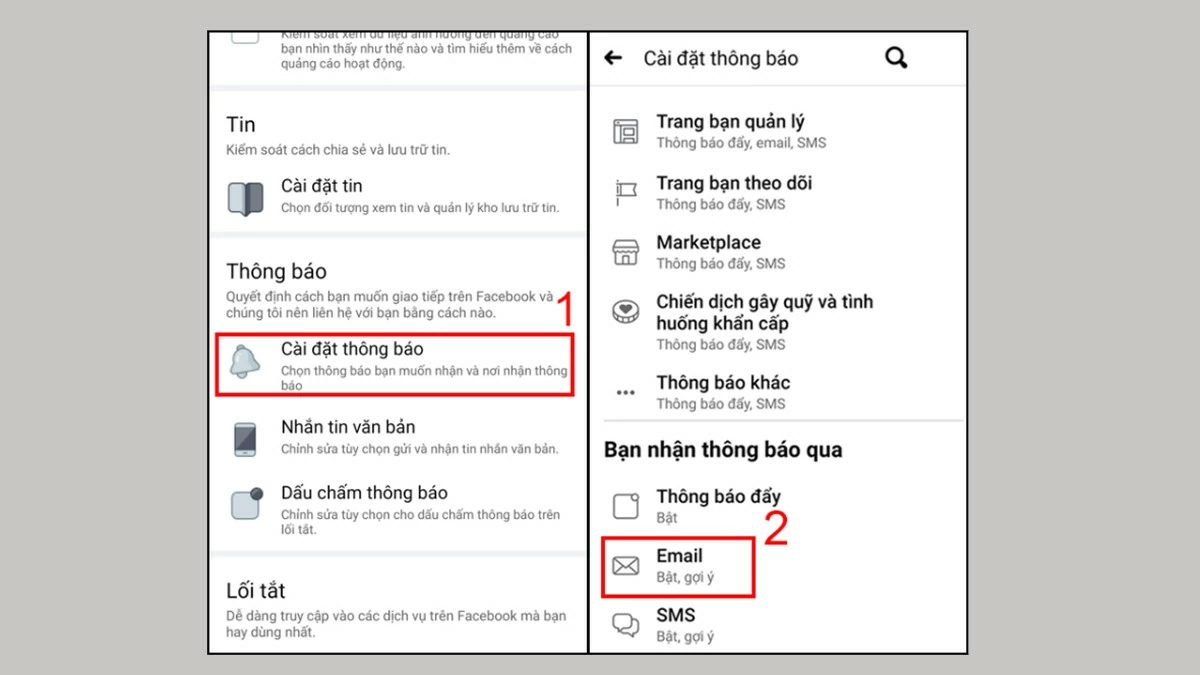
Step 2: Scroll down and select “Notifications,” then find and select “Email” under “You get notifications via.”
 |
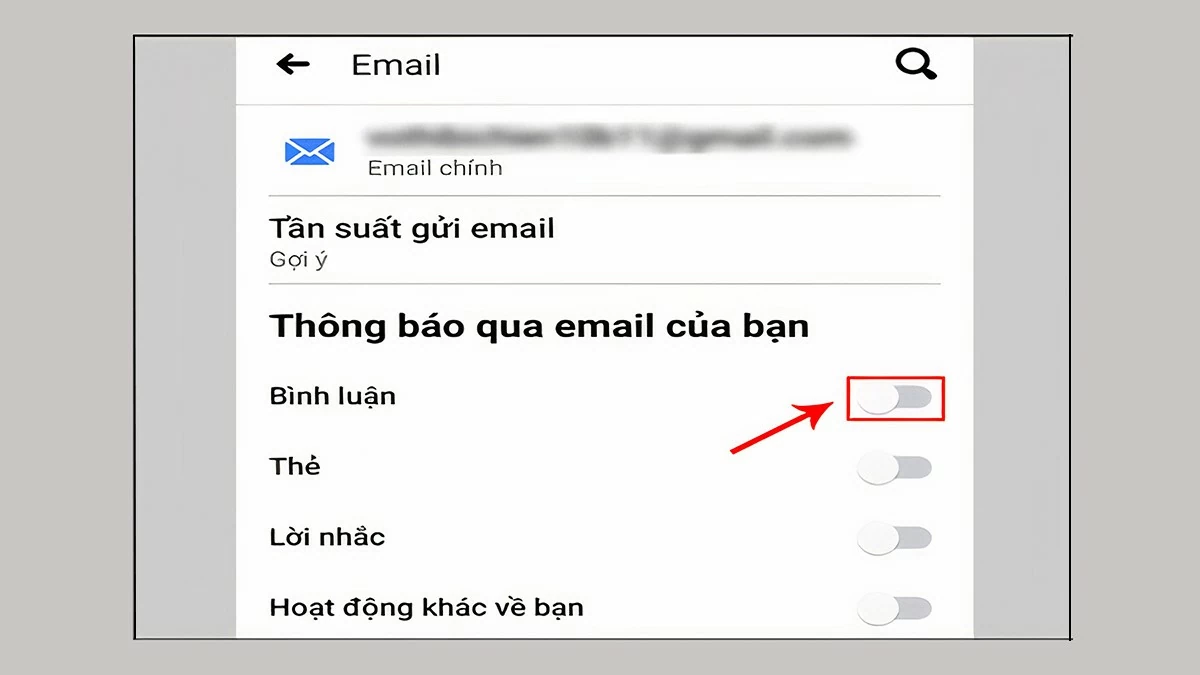
Step 3: Then, you will see a list of types of notifications that Facebook sends via email. You just need to turn off unnecessary notifications by sliding the switch to the left to disable them.
 |
Instructions to turn off Facebook notifications on gmail using computer
In addition to using your phone, you can also turn off Facebook notifications on Gmail via your personal computer, helping you manage your inbox more effectively. This process is quite simple and quick, you just need to access your Facebook account settings or use the filter and manage messages feature in Gmail settings. By customizing Facebook notifications, you can keep your Gmail inbox tidy and less disturbed.
Turn off Facebook notifications in Quick Settings
Step 1: Log in to Facebook: Open a browser on your computer and log in to your Facebook account.
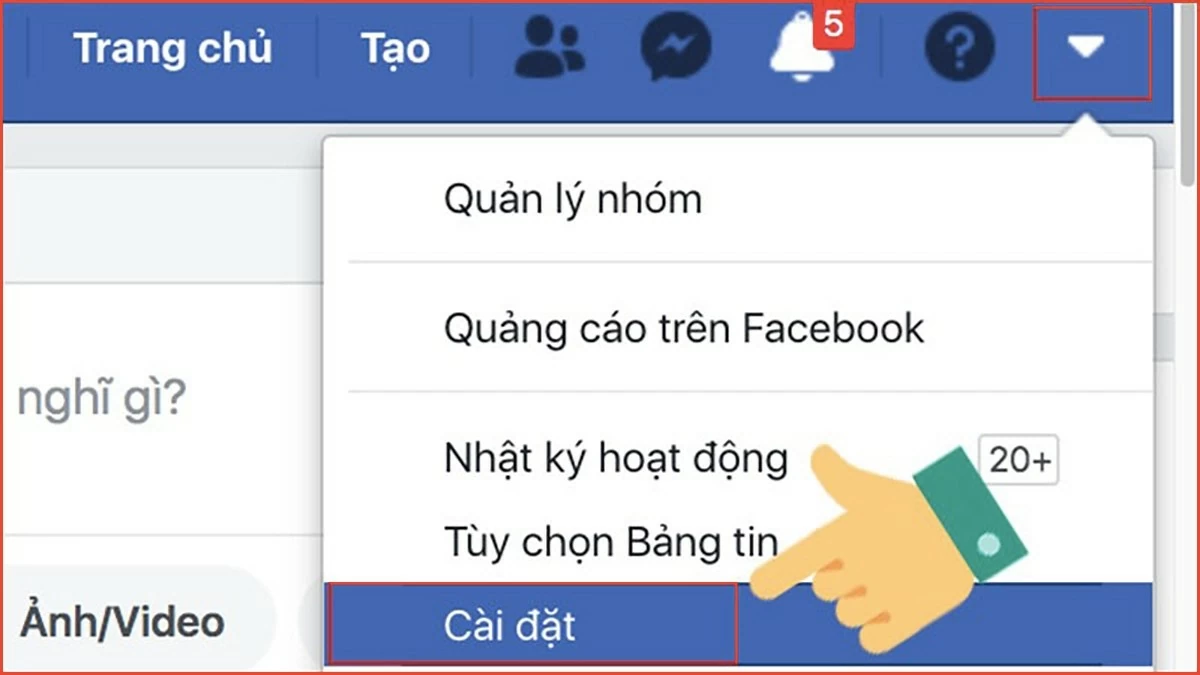 |
Step 2: Go to Settings & Privacy: Tap the down arrow icon in the upper right corner, then select Settings & Privacy and then Settings.
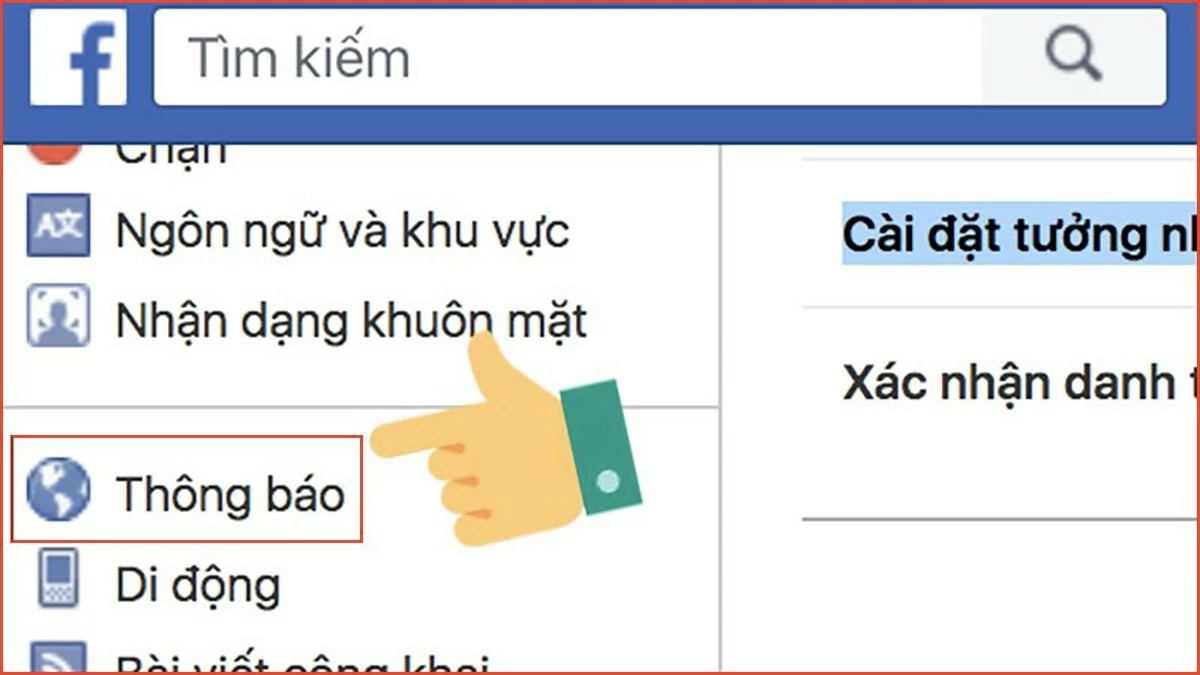 |
Step 3: Select Notifications: On the settings page, click Notifications in the left menu.
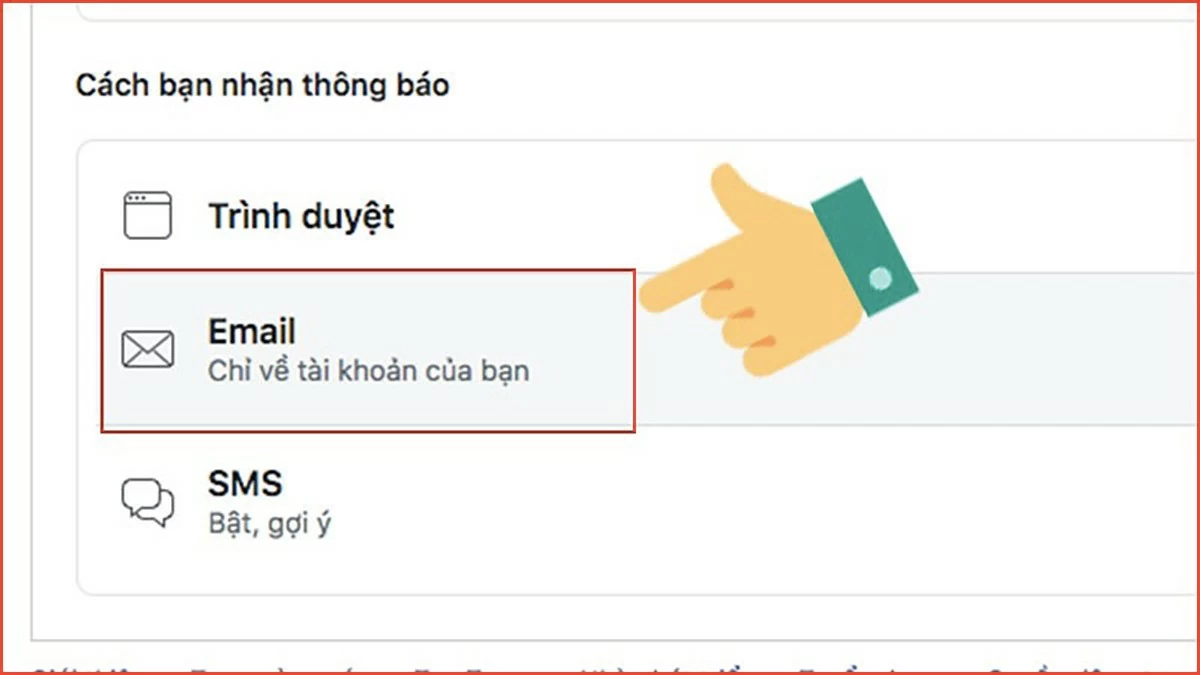 |
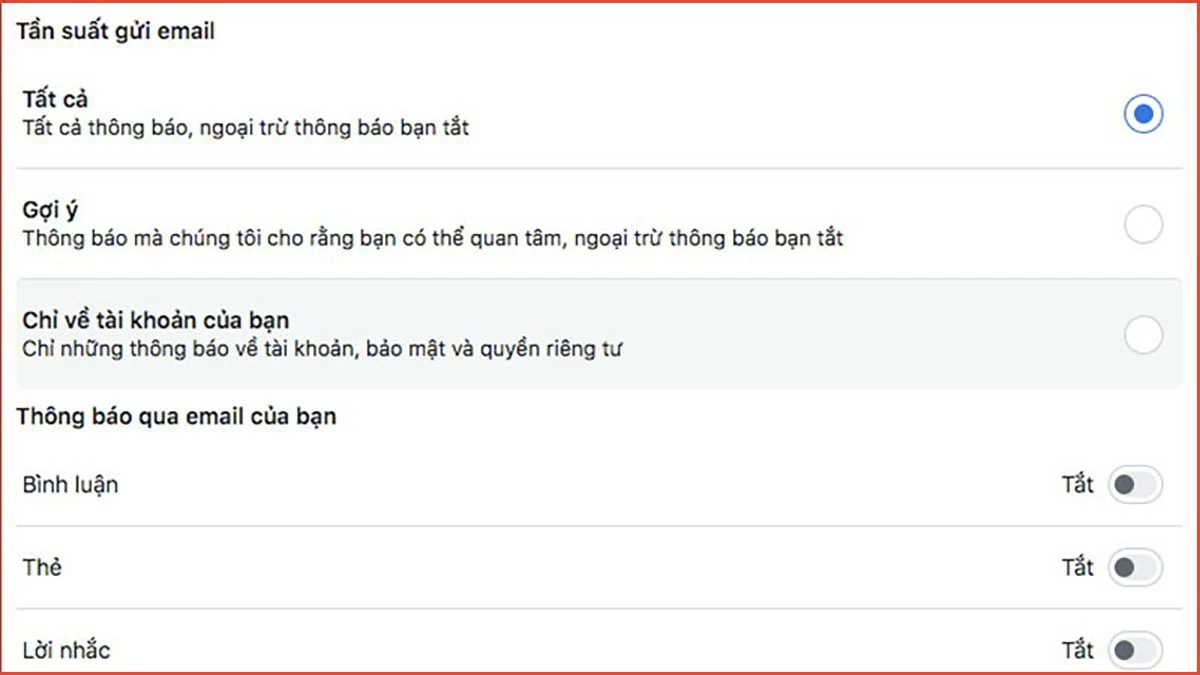
Step 4: Select Email options: Here, you will see the Email section, which allows you to adjust the types of notifications sent to Gmail. You can choose to turn them all off or just remove unnecessary notifications.
 |
How to Turn Off Facebook Notifications in Gmail Settings
You can easily manage notifications from Facebook by setting up filters in Gmail, which automatically sort or delete unnecessary emails.
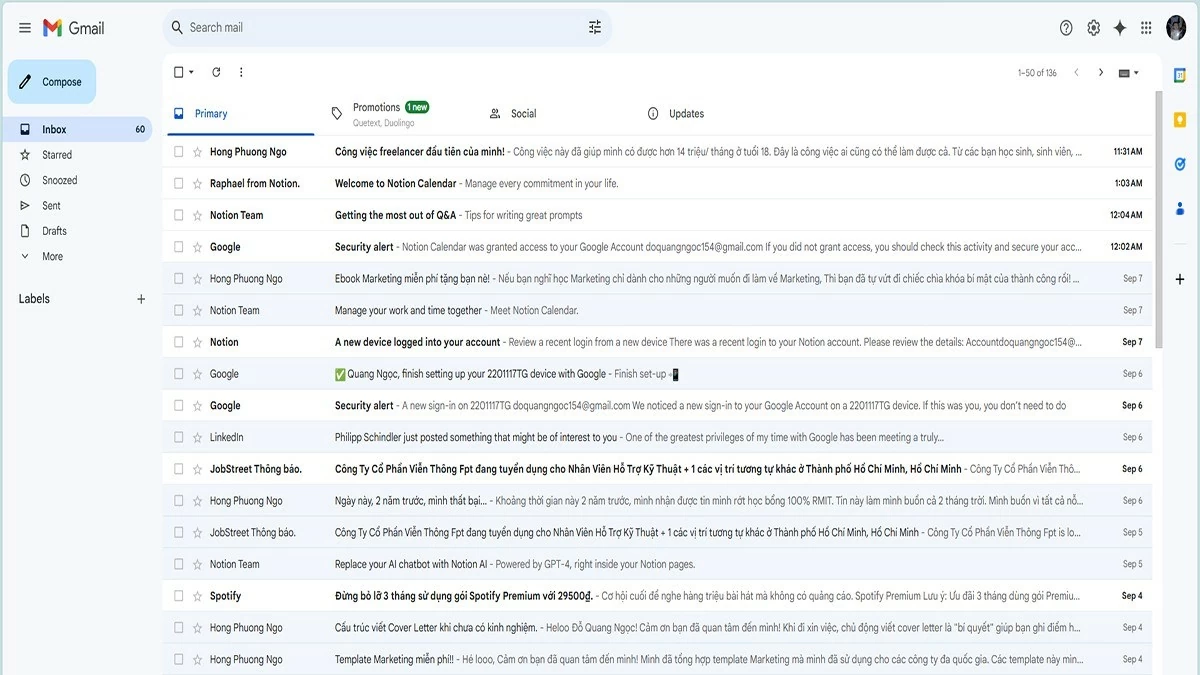
Step 1: Log in to Gmail: Go to the Gmail page on your browser and log in to your account.
 |
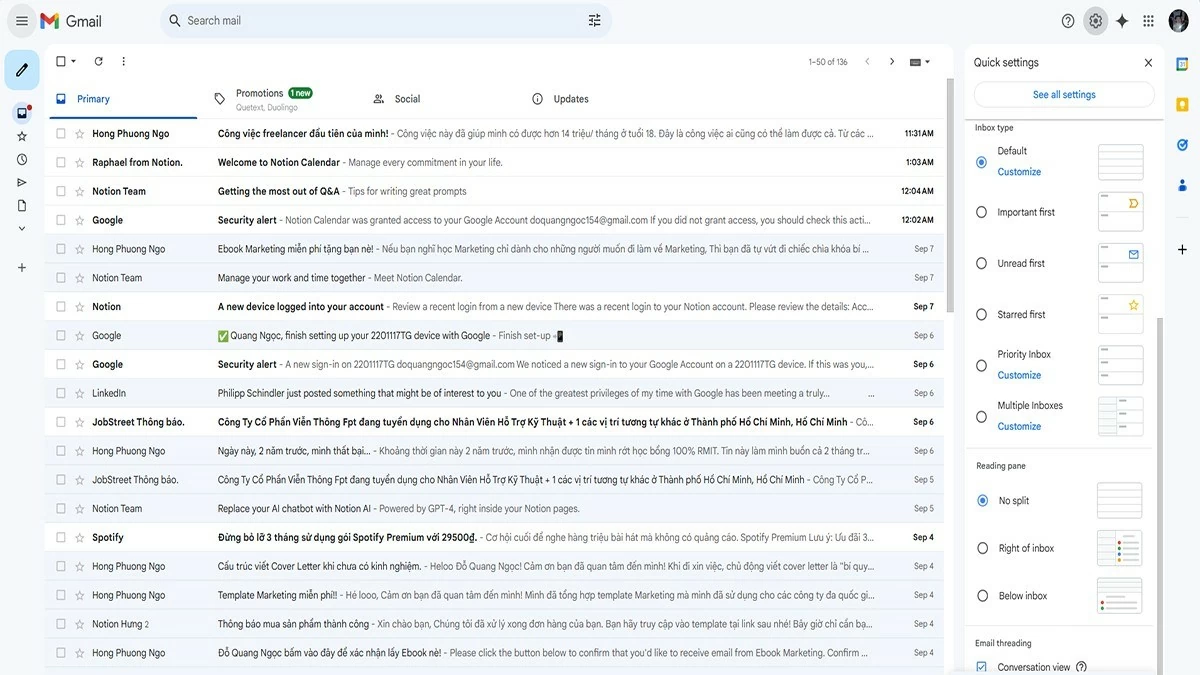
Step 2 : Set up filters: Click on the gear icon in the right corner and select “See all settings”.
 |
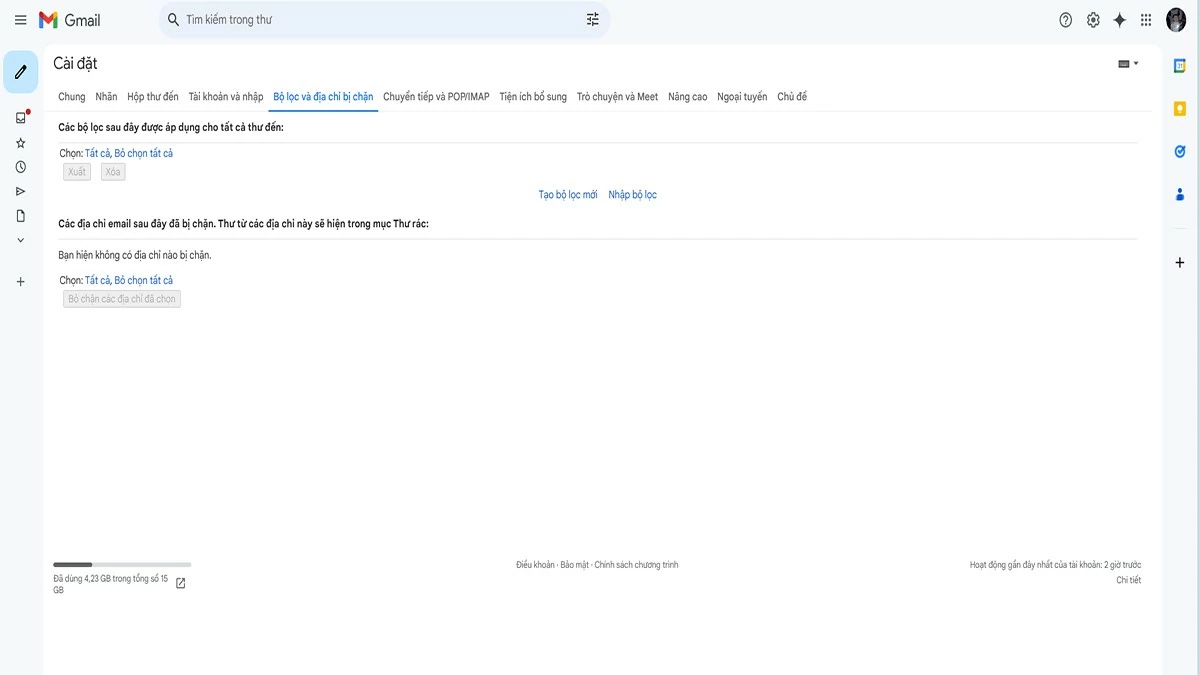
Step 3: Enter Facebook email address: In the "From" box, enter the email address that sends Facebook notifications (for example: "Facebookmail.com"), then click "Create filter".
 |
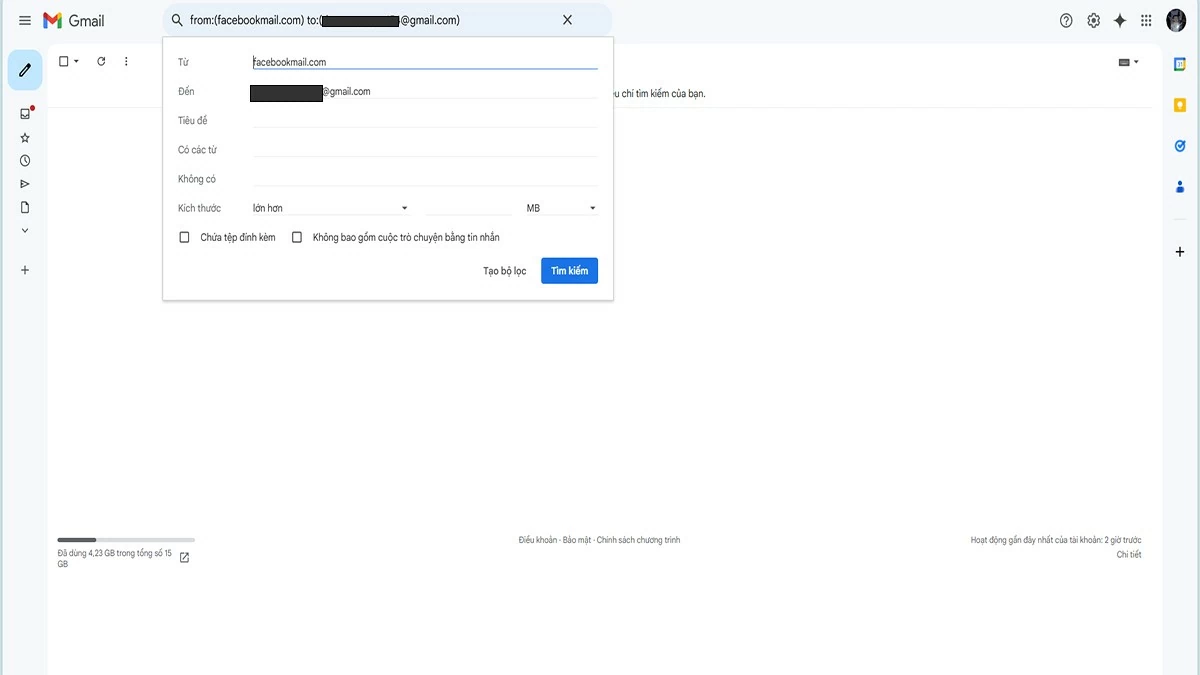
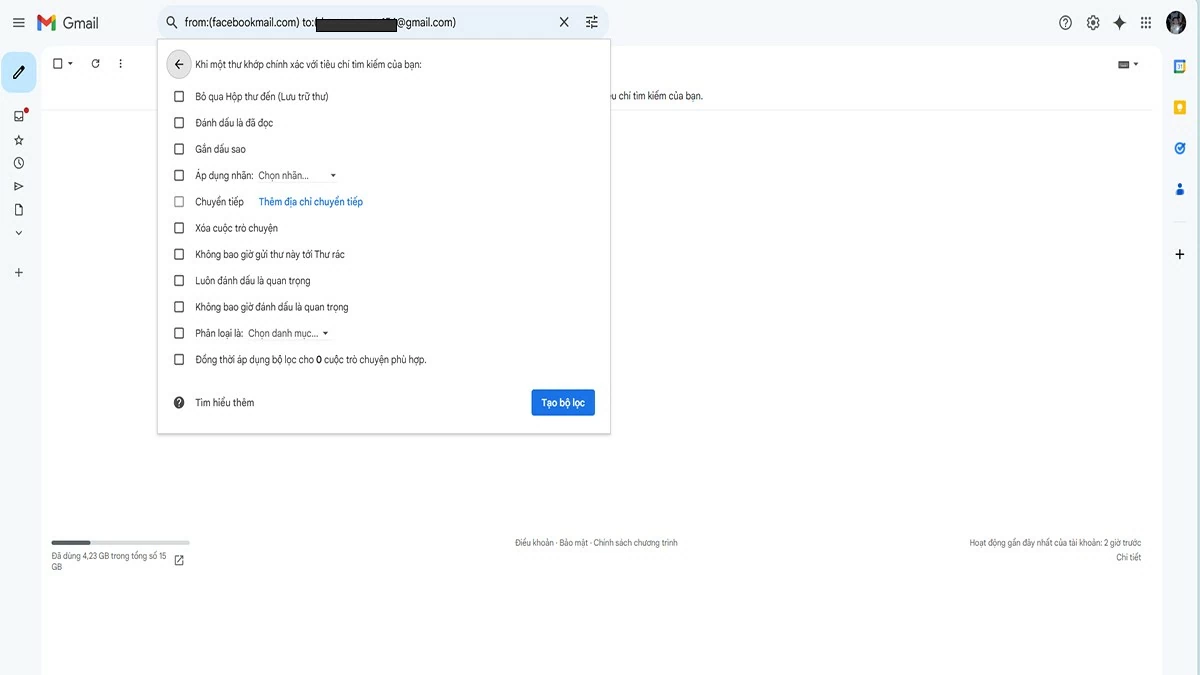
Step 4: Choose an action: You can choose actions like "Delete" or "Archive" to automatically manage these messages each time they appear in your inbox.
 |
Step 5: Save Filter: Finish the process by clicking the "Create Filter" button to save the settings you just selected.
 |
In short, turning off Facebook notifications on Gmail helps your inbox become more organized. This not only reduces email clutter but also prevents the annoyance of constant notifications, helping you focus and work more effectively. Moreover, good email management will help you easily find and handle important messages without being distracted by unnecessary information.
Source: https://baoquocte.vn/cach-tat-thong-bao-facebook-tren-gmail-vo-cung-don-gian-289446.html


![[Photo] Prime Minister Pham Minh Chinh receives Deputy Prime Minister of the Republic of Belarus Anatoly Sivak](https://vstatic.vietnam.vn/vietnam/resource/IMAGE/2025/4/2/79cdb685820a45868602e2fa576977a0)


![[Photo] Prime Minister Pham Minh Chinh receives CEO of Standard Chartered Group](https://vstatic.vietnam.vn/vietnam/resource/IMAGE/2025/4/2/125507ba412d4ebfb091fa7ddb936b3b)
![[Photo] Special relics at the Vietnam Military History Museum associated with the heroic April 30th](https://vstatic.vietnam.vn/vietnam/resource/IMAGE/2025/4/3/a49d65b17b804e398de42bc2caba8368)
![[Photo] Comrade Khamtay Siphandone - a leader who contributed to fostering Vietnam-Laos relations](https://vstatic.vietnam.vn/vietnam/resource/IMAGE/2025/4/3/3d83ed2d26e2426fabd41862661dfff2)











Comment (0)